Saturday, September 08, 2012

Under the Sea


Jenni saw me doodling this cake on the corner of a piece of paper and decided it was just what she wanted for her birthday. 

To mimic the deepening blue of an ocean as you travel from the surface to the ocean floor where the coral is I used an ombre blue color scheme. I started at the top with white frosting and gradually added more blue tint and I worked my way down. 

To create the coral, I tinted frosting yellow and orange and swirled it together in a pipping bag. I then pipped thick lines up the side of the cake to mimic the shape and forms of coral. Then I added pink and purple tinted frosting to the bag and with a small writing tip piped over the orange lines. All together the texture and color of the frosting made the coral pop in this under the sea themed cake. 

The Happiest Birthday day just got Happier!


Two out of town Guests were celebrating a 10th and 8th birthday at Disneyland so what better way to celebrate than with Mickey and Minnie Mouse birthday cakes. I think my favorite part of the cake and the process was seeing a picture of little Grace’s genuine excitement.

These were 6" chocolate cakes with vanilla frosting. Even the hat is chocolate cake! I just baked the batter in a cereal bowl added two round chocolate wafers for ears and poured melted frosting over top. When the frosting dried it created that seamless glossy look. And of course to finish it off Tyler and Grace’s names were “stitched” on the hats, just like they do at Disneyland. When the cakes were all done and ready to go I placed them on cake boards covered in authentic Disneyland park maps!

I hope all their dreams came true at the Happiest Place on Earth!

Sixlets


This is a two tiered (8" and 6") chocolate cake. With a light blue buttercream and yellow sixlets. I stopped by a Sweet Factory at the mall where they have these candies separated by color. You can switch up the sixlets with any of your favorite candies like skittles, M&Ms, Sweet tarts, etc.

Rosie Swirl


This is a one tip cake! All I did was evenly frost the top and edges and made a vertical swirl motion with a drop flower tip from bottom to top.

This was a chocolate 4” and 6” two layer cake. The shining star of this cake was the frosting! I made a traditional buttercream frosting and added a hint of cherry vanilla flavoring… YUM!!!! I also coulnd’t get over how gorgeous the frosting color turned out. I was really pleased with the final product. 

Happy 4th!


Instead of a traditional flag cake to celebrate our nations birthday, I decided to take a little inspiration from some of my favorite summer fruits. This berry flavored cake is frosted in a vanilla pudding coolwhip frosting and covered with berry almond flowers. The flowers are extremely easy and a great way to add a festive touch to your 4th. Just alternate between the red and blue berries you have chosen use and add slivered almonds about the berries to create pedals. 

Saturday, June 23, 2012

Lemon Poppy Seed "Cake-Cream" Sandwiches


These delicious "cake-cream" sandwiches are made with lemon poppy seed muffin mix and a honey butter cream filling. Check out my how to page to see how you can make them too!

Honey Bee


A honey cake for one of the sweetest little bees I know. This was a vanilla almond cake with a honey butter cream frosting. I used an 8'' pan and let the center bake to a mound. Usually I would cut off the mounded top and level the cake off, but for this cake I left it to give the beehive the dome effect. 

To create the beehive,  I first colored a tiny bit of frosting black and frosted a small section of the side of the cake. I then used a number 12 tip and piped a yellow ribbon of frosting in a circular motion all the way up and around the cake. I used the same tip to pipe the bees, I just added a little bit more yellow dye. To complete the bees I piped tiny black stripes and eyes with a number 3 tip. And last but not least I used a number 102 tip for the wings and flowers. 

Happy Birthday Day Natalie!


Saturday, May 19, 2012


This is a Devil's Food Chocolate cake with a chocolate almond frosting. I started by filling and frosting the layers and letting the frosting dry and become slightly hard. I then gently pressed the stencil against the side of the cake and spread the cream colored frosting on top. To get clean lines and avoid the frosting seeping under the stencil in all directions, I started the dollop of frosting at the left and spread in a left to right motion until I had applied the desired amount. Then ever so carefully pulled the stencil off leaving the design on the side of the cake. To add the finishing touch, I framed each side of the cake in a pearled boarder.

When I delivered the cake I was walking down one of the quaint streets of Balboa Island and two different couples stopped to admire the cake. I just got my business cards in this week and my friend Lauren, who was with me, said, "Here have one of her business cards." We joked that I should promote my business by walking up and down the streets with cake and business cards in had. Spreading the news on Lolo's Layers one slice at a time.

Buttercream Ruffle


This was a two tiered chocolate cake filled with carmel filling and iced in a two tone white and pink buttercream. I separated the icing into to colors, 2/3 pure white and 1/3 a soft pink color. I added both colors of frosting in the piping bag to create the two toned effect. I used a 2D drop flower tip to create the ruffle design.

The flower faceted to the side is actually a tulip. I gently bend the pedal back so that the flower would fan out against the cake. I love that this exposed the beautiful colors on the inside of the pedal.

Lisa Ann was so surprised and excited about her pink ruffle cake, and I think it's fits her personality perfectly.

Happy Birthday Lisa Ann!

Thursday, April 12, 2012

Painting the Roses Red


Adriana was Queen for a day as we celebrated her wedding at a surprise Wonderland Tea Party. This Alice theme wedding cake was one of my first using fondant for more than just an accent. I learned a lot about fondant and why so many people love to work with it to get just the right feel for their cake.

I started with one giant ball of white fondant and individually colored smaller sections green, red, and yellow.  To color fondant, you add a drop or two of gel coloring and kneed until you have a smooth distribution of the color you are looking for. 

For the leaves I rolled out a ball of fondant about the size of my fist to 1/16th of an inch. I then used a leaf cookie cutter to cut out the individual leaves. I let the leaves dry over night, which is not necessary but helps break up the work. I then placed the leaves around the cake in sporadic patterns and in three layers to give it the proper texture and depth. 


The roses are handmade out of fondant as well. The cake is covered in "painted" red roses, the dreaded white rose, and toned roses that are in the process of being painted to be presentable for the Red Queen. I made the roses different shapes and sizes and scattered them round the topiary cake.  For the last royal touch I placed a fondant heart crown on top. 

I am so glad there was a royal occasion so I could paint the roses red!

Monday, March 26, 2012

Pink Ombre Cake


The very talent Shelly Collins had a garden fairy vision that would make you feel like you were attending a tea party for the Queen of the Fairies. This was the sweetest little girls party I have ever seen, which was only fitting as it was for the sweetest fairy I know, 
the newly 3 year old Gwen Collins. 

Her mom Shelly had everything planned to a T and recruited my help to decorate an ombre cake for the festivities. If you don't know what ombre means, that's ok neither did I, it just means a gradient of color. It took some trail and error to get the perfect colors but it turned out perfect in the end, and even matched the ombre napkins on the table! 
  
Of course the cake was topped with sugar pearls lightly covered in pink pixie dust. You know, all you need is faith and trust, and... 
a little bit of pixie dust!

Happy Birthday Mom!

My mom is a pretty special lady so I wanted to make her a pretty special cake to celebrate the day when one of the most wonderful women in the world was born.

Her birth flower is the daffodil so I knew I wanted to incorporate in into the design. As I thought more about it my thoughts turned to spring, and vibrant colors, and fresh berries! I frosted the cake with a ribbon ruffles in a spring purple and topped the cake with 4 fresh daffodils I bought from the market the day before, so they would have a chance to bloom.


The cake it self was DELICIOUS!!!! I used a yellow cake mix and added a thawed bag of frozen mixed berries. It was such a simple addition to the batter and is probably one of my new favorite cake recipes. We served it with two creamy scoops of raspberry chocolate ice cream. It was the perfect combination.

Happy Birthday Mom, I sure love you!

Saturday, March 24, 2012

Luck O' the Irish


What better day to "taste the rainbow" than Saint Patrick's Day! There were three main elements to create the look of this cake, the rainbow, leprechaun and pot o' gold. 

To create the rainbow I bought 3 large bags of skittles and and separated the colors in to bags. It sounds like a tedious job, but I was watching a great movie and it went really quick. When applying to the cake I followed the patter of the rainbow for color blocking. 

The little leprechaun's body and face are made of fondant and his hat and suit are out of butter cream. I rolled up little balls for his hands and just piped a large rod of frosting from his hand to shoulder to create the arms. For the rim of his hat I used a flat tip and then just kept piling up the butter cream to give the top hat it's height. 

The pot o' gold was baked in a coffee mug and cover with black fondant. I piped a big glob of frosting on top and cover it with gold tinted sprinkles. Finally I dusted the pot with gold luster dust to finish it off.

This was a fun colorful cake that I think was perfect to celebrate the luckiest holiday of the year.  

Monday, February 13, 2012

Valentine's Hearts

What better way to say Be Mine than with cake and everyone's favorite Valentine Conversation Hearts. I wanted this cake to celebrate the girliest holiday of them all inside and out. So when you cut out a slice you will reveal a bright pink strawberry cake. What a fun surprise! 


The great thing out this festive cake is that no special tools or tips are required. All you need to wow your valentine is the following:

  • One box strawberry cake mix
  • One can vanilla frosting
  • One 6" cake pan (Baking tip: when trying to fit a whole cake mix into such a small ban, line the edges of the pan with notebook paper and leave an extra 2-3'' above the edge of the pan. This extends the height of your pan, allows the cake to rise evenly, and prevents the batter from spilling over the edge.)
  • 6 boxes of Conversations Hearts (You will only use about 5 boxes worth but have the extra allows you to pick and choose the best looking one to put on your cake.)
  • 2 candy sticks or skewers
  • An 8" piece of ribbon
  • Glue 
  • Construction Paper 
  • Scissors
  • Markers
Don't worry the last few items don't get baked into the cake, those are just for making your Be Mine banner cake topper.


Show 12 of your favorite sweetheart how much you love them by inviting them over to share a piece of this sweet treat. 

Happy Valentine's Day!

Sunday, February 12, 2012

Toffee Ganache


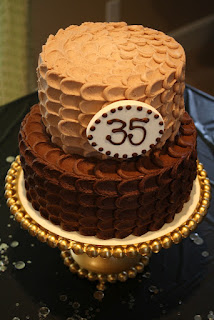
This cake was for my brother-in-law's 35th birthday. When we were brainstorming about what to do for his cake, he kept referring back to Dad's birthday cake and how much he liked it. (This is the Big D's Birthday cake that was an earlier post on my blog) Well, I wanted to make it unique for him so I tweaked it just a little. 

His favorite cake is yellow with chocolate frosting, but he also really like toffee so I combine all of those into a few rich layers. Each tier of the cake was torted into 3 layers of yellow cake separate by a layer of rich chocolate ganache and toffee bits. The ganache was made from scratch and chilled over night to help hold it's form as a filing and not squish out the sides under the weight of the different layers. Then a generous layer of toffee bits were add and another layer of yellow cake. 

The frosting was a coco buttercream enhanced with a slight toffee flavor and colored two shades of brown for contrast. The decoration technique is a really fun one to do. You create a vertical line of frosting dots and  the with the back side of a spoon, slightly push down and drag to the right. You then place your next row of dots over the "tails" of the previous row and repeat. When finished, it creates a beautiful layered look that is clean and classic. 

The 35 was added as the finishing touch to honor Seth's big birthday. I poured white chocolate into an oval cookie cutter and let in harden. When the chocolate was firm, I smoothed it by scrapping off the imperfections with a smooth metal spatula in long sweeping motions that started and stopped at each end of the shape. I didn't want there to be any grooves which is why I did not us a common kitchen knife with a serrated edge. I then used my leftover frosting from the bottom tier and piped on a 35 and  a dotted border. The chocolate piece itself was adhered with a healthy amount of the tan frosting from the top tier so the heavy chocolate piece would not slide off the side of the cake. 

I am soooo happy with how this cake turned out and most importantly...the birthday boy loved it too! 

HAPPY BIRTHDAY SETH!!! 
Red Velvet

Threw together this birthday cake for a friend and in the interest of time, I kept the techniques really simple. I used a cake mix and store bought frosting because I didn't have the time to make anything from scratch. 

Because I didn't want to spend hours on small details like normal, I picked a design wouldn't take me a lot of time to execute. I slapped on a layer of icing and used and icing comb to create the grooves. I then cover the bottom half with mini chocolate chips. Both of these techniques are very forgiving and allow a lot of imperfection in the way it is frosted. The frosting garnish is done by using a twisting motion with a drop flower tip. Like the cupcakes, this is a relativity easy cake to do if you have the right tools. 

Cupcakes

Nothing too special about these cupcakes. I wanted a cute way to use some of the extra sprinkles from my pink Champagne cake and came up with these little treats. It's yellow cake with coco frosting and swirled with a number 2D tip.

This was so easy any one could do it. Prep, baking, and decorating took me less than an hour, so also great if your running low on time and need to whip together a dessert. I have always said a good cake tip is all you need to be an impressive decorator. 

Saturday, January 28, 2012

The Mad Hatter


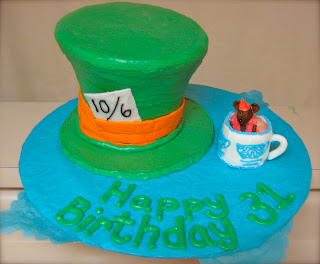
This cake was for my roommate's mad tea party birthday. She is a little mad in the best sort of way so this was the perfect cake for her. 

To create the hat I stacked 9", 8", and 6" cake rounds on top of each other and carved them down to get the tappered hat. I then rolled out foundant to create the rim. The 10/6 card is made of royal icing that I let dry and harder so that it would stand up and out away from the cake slightly. The tea cup and dormouse are also completely edible and molded out of dyed foundant. 

It looks relatively simple but you would be surprise how much time goes into even basic shapes and designs. I always know when the cake is finished becuase I start involuntarily jumping up and down and yelling, "AHHH! I love it, love it! EHHH!" Haha. There is nothing better than a finished cake that turns out just how you imagined. 

Monday, January 23, 2012

The Big Apple


My good friend Crystal is leaving for her mission to New York, New York South on Wednesday and after taking my own trip to New York this week I had lots of inspiration. I thought she should "Start spreading the news" with a cake just for her before she set off for the Big Apple!


The cake was baked in two separate pieces to create the apple shape. I then frosted it with three different shades/layers of red and piped a stem, leaf, and New York City Skyline to finish it off. I also printed an area map of where she will be living in New York and cover the cake board with it so the giant apple could be the "You Are Here" symbols for her new city:)

Saturday, January 07, 2012

Pink Champagne

Happy  Birthday Camille and Mary! The girls threw a Mocktail party so I though I would keep with the theme. It is chocolate cake with champagne frosting, tinted sugar beads which are supposed to be the fizzing bubbles of the drink, and of course some virgin pink champagne holding up the top tier. Everyone loved it and it was a great night! Thanks for having a birthday girls.. I sure love you guys!

Thursday, January 05, 2012

Happy Birthday Lolo

This was my birthday cake so I used my favorite tips on the 3 tiers. 

Boo! Happy Halloween!

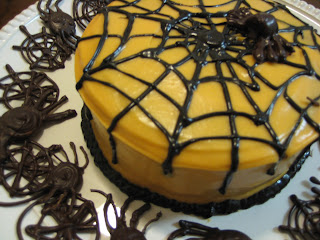
I had a small leftover cake in my freezer and we were having people over to carve pumpkins so I thought I would pull it out and have a Halloween treat to reward all the creative carvers. 

It was a red velvet cakes with cream cheese frosting. The spider on top is a little marshmallow covered in chocolate. 

Wednesday, January 04, 2012

More Motorcycles

Once you know my family it's not hard to guess why there is more than one motorcycle on this blog:) I made this for my darling nephews who had a combine birthday this summer. And yes that is my favorite rider, James "Bubba" Stewart, winning the race. The table top is out off Rice Krispies and the whoops section is licorice covered in cookie crumbs. 

Happy Birthday Karen

Karen's favorite dessert is Boston Creme Pie so I made a yellow cake, with vanilla custard filling, chocolate frosting, and a cherry to top it all off. Everyone at work was so sweet with all their ooohhhs and awwwhhs when they saw it. 

Happy B-Day Big D!

This cake tasted sooooo good! It is a rich chocolate cakes with banana cream filling and decadent homemade coco frosting. I loved this frosting technique, it was so simple and looks great. Sorry for the candle holes in the photo, forgot to get a good pic again:) That should be my new year's resolution!

Go Anteaters!

Congrats Jeff! My brother graduated with his MBA from UC Irvine and his sweet girlfriend wanted to make sure we celebrated his huge accomplishment! In case you were wondering, their mascot is an anteater:)

Matterhorn Mountain


My friend at work wanted to surprise her new hubby with a Groom's Cake of his favorite ride at Disneyland, the Matterhorn. I loved loved doing this cake. I am terrible at remembering to take good final product photos of my cakes so the first one doesn't have the Yettie and the second does but was on my phone so it's really little.